Uncategorized
Dress refashion – size matters
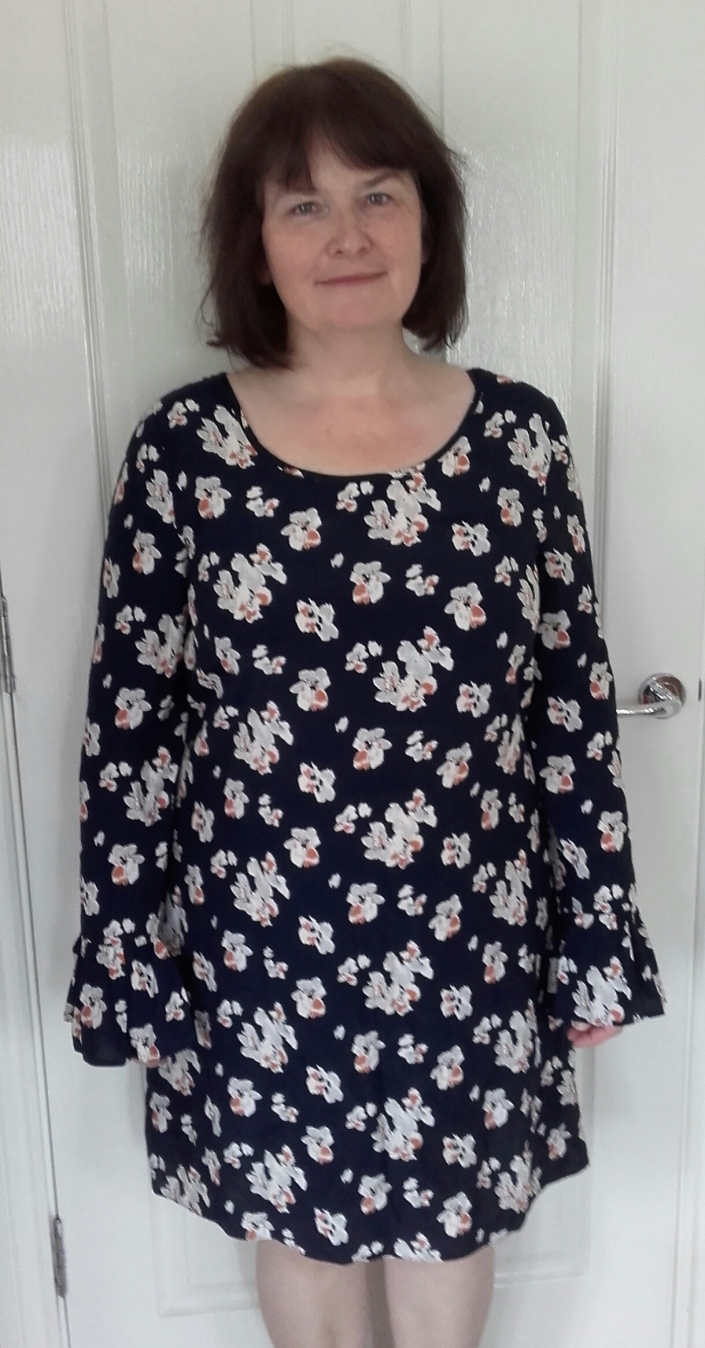
I was given this dress last year.
It came in a bag of clothing from the nursing home where my daughter works. A member of staff had brought in some clothes ‘in case any of the residents can make use of them’.
Relatives keep an eagle eye on the clothes their family members are wearing because the relatives buy the clothes, and will spot any imposters immediately, making a negative judgement about the standards of care at the home. This is how the dress found its way to me, because despite good intentions it was impossible to give it to anybody. The dress is 100% viscose, no country of manufacture admitted to ( I would guess Bangladesh.) Florence and Fred brand ie cheap to buy originally.
I normally avoid budget brands when I’m charity shopping because I’ve got a bit of a superior attitude, but I’m also unable to resist something for free, which usually triumphs over snobbery.
This dress doesn’t really know what it is meant to be. The lightness of fabric could make it a summer dress but the navy pattern and long sleeves are more evening wear. I am not even sure myself in which direction I am taking it – maybe summer casual evening wear but definitely a better fit.

The bell sleeves are bang on current trend, but not for me. I have tried them before in a previous decade and know they are rubbish. I made an easy chop to make the sleeves elbow length.
Size matters
The size of this dress is UK 16. I have measured myself against size charts and my body parts are usually 3 different sizes. My bust is size 16, waist size 18 and hips size 14. It is the waist/hips mismatch which causes me the most problems. I have never had a particularly small waist and ageing has not improved the situation, however although this dress fits my bust size, the neck and shoulders are too big, a common problem for me.
I wanted to raise the neckline and add interest by sewing the cut off bell component of the sleeves onto the front of neck. I hoped this would also keep the neck together a bit and prevent it slipping down my shoulders.
I pinned one of the sleeve frills onto the neck and it looked OK
I unpicked the original neck binding and re-sewed it back on to incorporate the sleeve frill, there was enough length of neck binding because I was making the neck smaller.
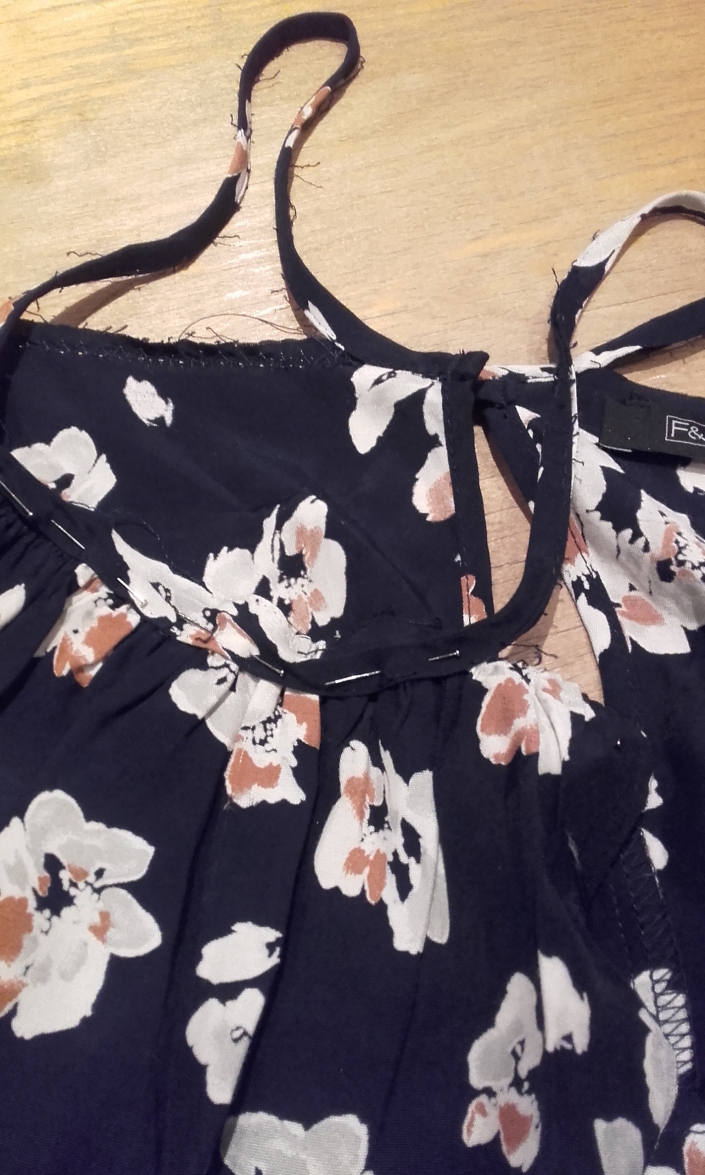
I unpicked the binding on the keyhole fastening at the back and sewed up the seam, just to bring the neck together a bit more – I could still get the dress over my head quite easily.


The dress did look better and I was pleased with the neckline work, but was still more short and flimsy than I would like, so with another chop it became a tunic length top.
I added side tab openings.
![20170305_124833-1[1]](https://whatthesew.files.wordpress.com/2017/03/20170305_124833-11.jpg?w=1536&h=1645)
Finished tunic
![20170305_105740-1[1]](https://whatthesew.files.wordpress.com/2017/03/20170305_105740-11.jpg?w=705)
Ideal holiday wear for a recent trip to Seville
![20170321_092212-1[1]](https://whatthesew.files.wordpress.com/2017/03/20170321_092212-11.jpg?w=367&resize=367%2C475&h=475#038;h=475 "20170321_092212-1[1]")
![20170321_082223-1[1]](https://whatthesew.files.wordpress.com/2017/03/20170321_082223-11.jpg?w=330&resize=330%2C475&h=475#038;h=475 "20170321_082223-1[1]")
Long skirt to top refashion
I bought this long skirt because I was attracted to the large amount of fabric and attractive border and it cost me £3.49, which was 10% of the original, still attached, price tag of £35.

The fabric was 100% polyester and there was a short gauzy white underskirt which I ended up using for facings.

My plan was to make a top, using a pattern given to me by a friend, incorporating the border of the skirt and the original hem.
The fabric was very light and floaty and the brand was ‘Glamorous’, one I had never heard of. I looked it up and it appears to be an online shop of the type that claims to offer massive discounts. I don’t think that glamorous would have been my first choice of description for the original skirt though.

When I started cutting the pattern pieces out, it became obvious that this fabric was trouble. It slipped and frayed all over the place, even after weighing it down in every place possible.
My newly and expensively purchased ‘walking foot’ did help in the actual sewing though.

Here is the finished top. It will be good for travelling light because it takes up only the space of a light scarf and doesn’t really crease.

Bonus feature: Refashionables in Modern Art

On a recent trip to Tate Liverpool I was drawn to the above exhibit by Michelangelo Pistoletto entitled ‘Venus of the rags’ . The description describes the mound of clothes as ‘the detritus of modern society’ but I was thinking ‘that looks like a rather nice vintage scarf’

22 inch waist scuba skirt to 2 hour top refashion
Rather guiltily I went into my local Traid as they were having a sale (again). I think they were trying to get rid of all their summer stuff.
Why the guilt? Because to be honest, I already have enough clothes and could probably afford go a year or two without buying anything at all, but the trouble is I like making things so am now regarding refashioning as a fairly harmless hobby but nevertheless gave myself strict orders that I could only buy one thing.

My eye was drawn to this skirt. I liked the pale turquoise colour and also the fabric was a nice light scuba jersey knit, quite with a sort of shiny finish. This fabric was excellent to work with and scuba is certainly something I will be on the look out for in the future.

The amazing thing about this skirt was the teeny size of the waist. It was 22 inches (I measured it later). I don’t know anyone with a waist that small, and clearly there was no great demand for skirts in that size because it was brand new with labels.
This was the only way I could wear it.

I could see that despite the small waist size, the large pleats meant there was actually a decent amount of fabric in there, enough to make a top anyway. The sales assistant gave me a funny look as I handed over £3.
I gave this skirt a wash using my usual cycle before attempting a refashion, it seemed to survive OK. The wash was also necessary because there were a couple of dusty footprints on the skirt. It had obviously fallen off the hanger a few times and been trodden on.

I removed the offending waistband to reveal a 56 inch wide tube of fabric.
There was also a nice organza lining in a matching colour.
I downloaded the 2 hour top pattern from sewdifferent. This is a simple pattern with just 2 pieces to make a raglan top
Actually wordpress, the link does work.
I took the precaution of making a toile from a sheet to check the fit – I wouldn’t want to go wasting a £3 charity shop skirt now would I?
The fit was good but I added a couple of inches to the body length and removed an inch or so from the sleeve length.
Sadly there wasn’t really enough fabric to make the whole thing from the skirt. I could have compromised a bit on the along the grain layout and patched a bit to make it fit, but I decided to instead use a contrast fabric for the sleeves.
I bought this lovely fabric on a recent trip to Norway when finding myself with about £12 in Kroner left over, and thinking that it was unlikely I would return to Norway anytime soon – no offence intended to Norway, I was just being realistic, I went into a fabric shop to see what I could buy with that sort of money. It was also jersey and a similar weight to the skirt fabric.
I think it looks like some kind of background wallpaper photo on a phone.
I made binding for the neckline from the skirt remains. The stretch in the fabric meant I could cut a less than 45 degree angle, and make sufficient binding with less fabric, and bound the hem with the contrast fabric.
The fabrics were a stretch jersey so I used a narrow zig zag stitch throughout, as I don’t have a serger. This worked surprisingly well.
The pattern instructions don’t tell you that there are no seam allowances included so it is up to you to work out where these are needed (everywhere except neck and hem) and add your chosen allowance accordingly when cutting out.
I only discovered this when reading the comments on the blog about the pattern.

Now a word about scuba fabric, which I have read up about since making this top It behaves very well under the needle and drapes smoothly. It also, apparently does not fray at all and when I made this top I thought it would look very nice without any hem but wasn’t quite brave enough to leave it like that. Information I have also found says that scuba does not breathe at all … UH OH. I will have to see how sweaty this fabric is IRL as a top.


BONUS FEATURE:

Although I was only supposed to be buying one item in Traid, I was amazed to find this beautifully hand crafted unworn dress.
It was originally priced at £18.99 but was now reduced to £3.
Someone had put hours of work into this dress, it was lined and had these lovely bows on the front and then they had donated it, why would they do that? and all their hard work was being sold for £3. I had to rescue it.

I have no idea what I am going to do with this dress but will try and find something to do it justice.
Auntie’s antimacassar to skirt refashion
This project started off as one thing (the bottom of a top) and ended up as something completely different (the top of a bottom)
When making my Refashioners denim dress I made a toile for the bodice.
It seemed a shame not to make a wearable garment out of this bodice so I headed to my stash for a suitable fabric partner and this is what I came up with.

This piece has a bit of a back story. I inherited it in a case of household linens from my great aunt. The fringe at only one end suggests to me that its some form of antimacassar .
I wouldn’t normally go using old pieces of fabric in a refashion, because I know this will speed up its demise, but this woven piece had some damage already.

Consequently I decided to use it with the underside to the front, as its woven it still looks good this way round, just an inverse of the front.
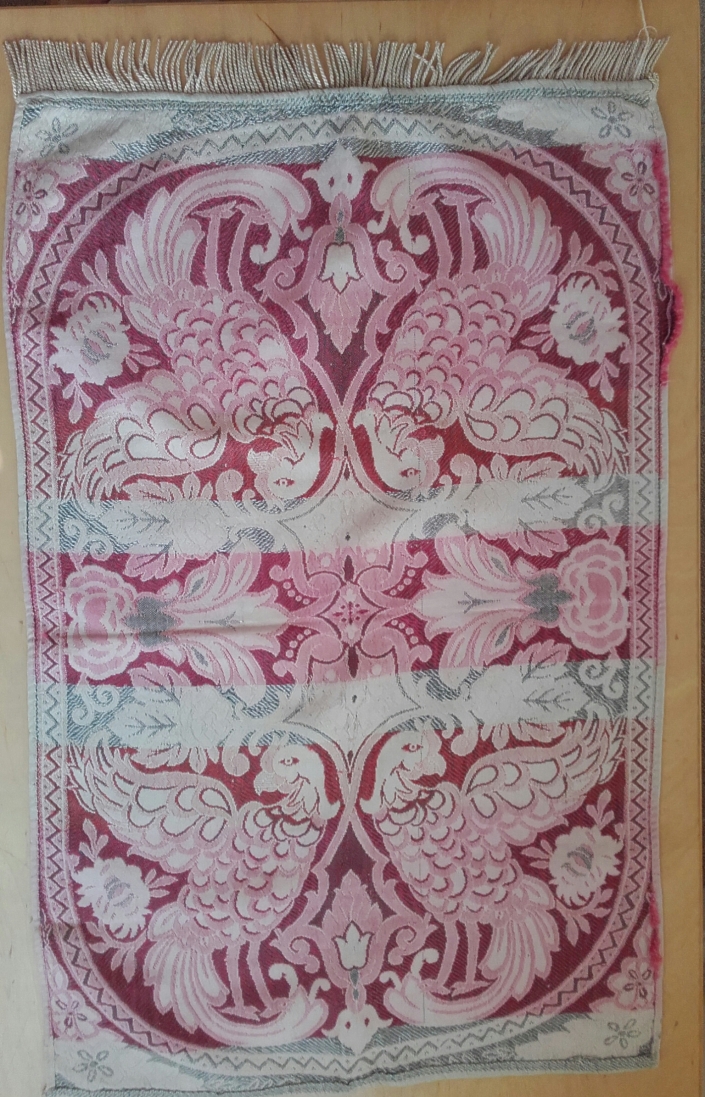
This item has been stuck away in a cupboard since 1993 and before that I don’t ever remember my aunt having this thing in use. I honestly don’t think she would have objected to the refashion.

I removed the fringe, which interestingly, had been added before the hem, cut the piece in half lengthways, and made a tube. The edges had been machine sewn with a long stitch. It was just the right width to attach to my bodice, give or take a couple of darts at the back and a bit of shaping.

This could have been left as a top at this stage but I decided to continue and make a dress because as a top it was a little too short and the stiffness of the antimacassar made it stick out a bit.
I cut some wedge shapes from the legs of 2 pairs of similar brown corduroy trousers I had in my stash.
The length of the wedges was limited by the knee to hem length of the trousers.
This pair was one I had been keeping as a sort of diet ‘target’ pair. They used to be comfortable about 10 years ago.

I laid out the panels under the bodice then stitched all the wedges together to make a skirt piece and pinned it to the top.

Unfortunately it looked OK on the table but when being worn, the antimacassar just didn’t seem to sit in the right place, and also seemed a bit too stiff.
As I had now cut up this old piece of fabric I had a responsibility to it, so the bodice will have to wait for another day and plan B was a skirt.
I unpicked the antimacassar from the bodice and sewed it onto the cord panels, having first adjusted the cord panels to fit the right size to fit the antimacassar.

This looked better but was not long enough for a skirt. I decided to add a yoga type waistband to both increase the length and make the skirt super comfy and also I would not then need to add a zip.
I cut a long tube from a t-shirt donated to me by my daughter, shaping the tube with a waist in the middle so it was designed to be folded over.
I cut this tube a tight fit so it would be stretched and keep the skirt up – that’s the theory anyway. I am always going to be wearing a top to cover the waistband, it isn’t designed to be on show.

Finally, I didn’t want to take any length off the cord panel section for a hem, so made some bias binding from a pillowcase to bind the hem.

Here is the finished skirt.


It has only taken, one antique antimacassar, 2 pairs of trousers, one t-shirt and one pillowcase to make so I hope I get some wear out of it.
Jeans to dress refashion

This will be my entry for refashioners 2016.
I don’t really wear jeans. My reasons are that they are too tight, and I don’t like wearing tight clothes, the fabric is too heavy and stiff, which makes them uncomfortable, and waistbands normally sit right in the middle of my stomach area, which cuts me in half when I sit down.
I do, however, like denim fabric
I have made a number of household items from denim – tea cosies, cushions etc
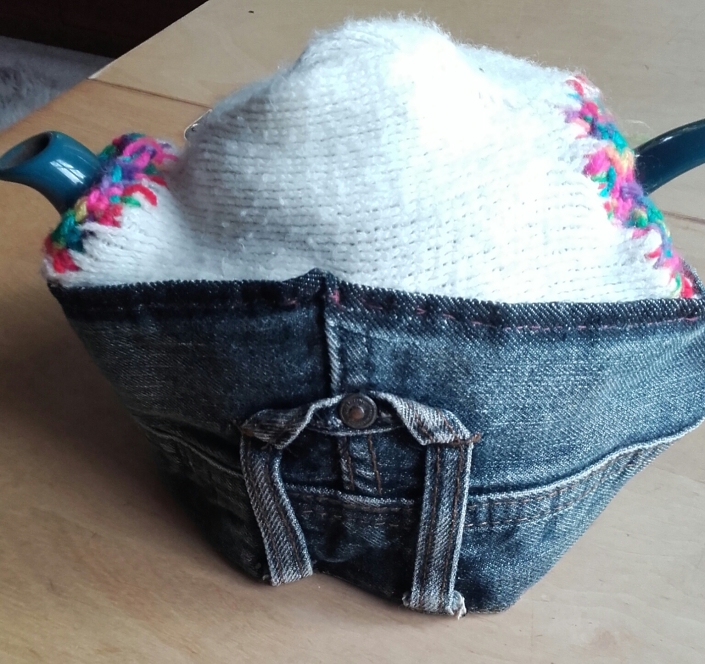
![20160825_082832-1[1].jpg](https://whatthesew.files.wordpress.com/2016/09/20160825_082832-11.jpg?w=705)
but as yet, no refashioned clothing.
With refashioners 2016 in mind I bought some jeans from Traid for £4.
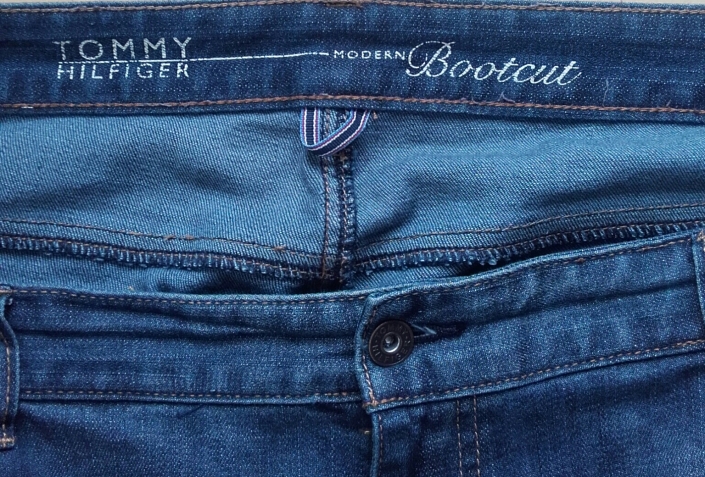
They were having an ‘everything £4 ‘ sale. The jeans are a size 18 Tommy Hilfiger, 99% cotton 1% elastane, made in China and are quite nice and soft with a bit of stretch and a large amount of fabric.

I looked them up, these jeans could easily have cost £50
The brief I gave myself was to make a dress from a pair of jeans using as much of the jeans as possible.
I did a lot of unpicking to the point of having 2 large leg pieces, pockets and waistband.


I had a vague idea of an empire line dress but also went round the shops for inspiration. This was the kind of thing I had in mind.
I decided to attempt pattern drafting.
Using pages out of a magazine to draw round myself in a mirror probably isn’t the best method.

The bodice pleats and neckline shape just sort of morphed out of what I needed to do to make the pieces fit, there wasn’t much vision and planning involved.
In the end I set the bar no higher than making something that fit.
I made some adjustment to the pattern and cut out the denim pieces. I placed the centre front of the bodice on the jeans seam but the other pieces were placed any old how to make them fit, but approximately on the grain, give or take a few degrees.
One of the refashioners said she didn’t want to make something that looked like it was cobbled together from an old pair of jeans – Oh dear, that was something like the look I was actually aiming for.
I had made a toile but from a fabric with no stretch whatsoever, so even after going to that effort several adjustments were needed in the denim version.
The toile got abandoned at this point due to lack of time and because I now wanted to make it into a wearable garment with a different skirt design.
The bodice was now starting to take shape, next stage was to add the waistband, salvaged from the jeans. It had to be cut down a few inches which I did in 2 places to avoid excessive bulk.
![20160821_160516-1[1].jpg](https://whatthesew.files.wordpress.com/2016/09/20160821_160516-11.jpg?w=705)
I added home made bias binding to the neck and armholes. This was made from fabric bought in a local market. That market stall is no longer there and has been replaced by an artisan bakery. Some people call this progress, some call it gentrification.
By now there wasn’t enough denim left to make the skirt, and someone who had planned this better would have made the larger skirt pieces out of the larger pair of jeans but luckily I already had a pair of flared jeans in a similar denim which had been given to me by my daughter, which would do the job.
I had already used the waistband of the second pair of jeans for an earlier project.
![20160721_112450-1[1].jpg](https://whatthesew.files.wordpress.com/2016/09/20160721_112450-11.jpg?w=705)
I laid the pieces on the bed to get some ideas, then stitched the legs onto the bodice. The skirt was beginning to look very much like the classic jeans to skirt refashion.
![20160821_223351-1[1].jpg](https://whatthesew.files.wordpress.com/2016/09/20160821_223351-11.jpg?w=705)
The original Tommy Hilfiger jeans still had enough fabric left to make two triangles to fill in the front and back, I had to pare down the flare to make this work.
I wasn’t going to cut up a third pair of jeans so for the side fill in panels I used more of the trim fabric.
![20160828_203809[1].jpg](https://whatthesew.files.wordpress.com/2016/09/20160828_2038091.jpg?w=2560)
I used both back pockets together to make one large pocket, which needed a stitch or two in the middle to avoid gape.
![20160908_100703[1].jpg](https://whatthesew.files.wordpress.com/2016/09/20160908_1007031.jpg?w=2560)
This pocket turned out to be my favourite feature because it was the perfect size to hold passport and boarding pass, and the middle stitch at the top gave extra security.
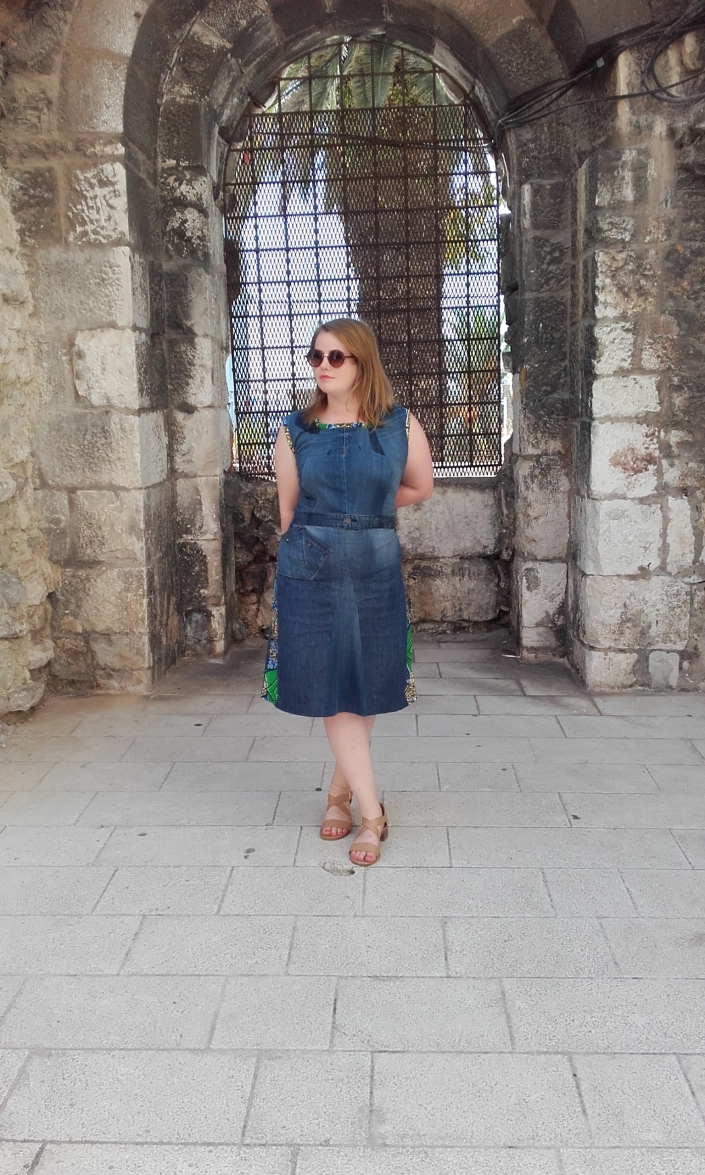
I was in something of a rush to finish this off because I wanted to wear it on holiday (Croatia) and would have probably added more jean details such as the coin pocket somewhere, and back pocket lapels, but at 2am before the holiday I had to call it a day.
I have to say I am really pleased with it, this dress may not be the most original make, and I am full of awe for some of the artistic and imaginative designs that other bloggers have produced.
![20160908_101744[1].jpg](https://whatthesew.files.wordpress.com/2016/09/20160908_1017441.jpg?w=2560)
The slevelessness made it cool enough to wear in warm temperatures and it provided just the right amount of fit shape, comfort and practicality for me.
A denim dress made a very practical holiday item because it could be worn several times without needing a wash, or I shoud probably say, showing the dirt.

And I shamelessly got my daughter to model it for me.
All refashions are unique, and there are improvements I could make to this dress if I were to repeat the process but then again I would be using different jeans so who knows, different mistakes may be made.
![20160908_102353[1].jpg](https://whatthesew.files.wordpress.com/2016/09/20160908_1023531.jpg?w=2560)
With such a great variety of inspiration from therefashioners, I’ll probably be making more use of denim in the future.
Scarf to top refashion
Someone had dropped this scarf on my route to work.
![20160727_094308-1[1]](https://whatthesew.files.wordpress.com/2016/07/20160727_094308-11.jpg?w=705)
Their loss was my gain.
I had originally intended to make it into a kimono, but most of the pattern action was in one corner. I got inspiration from pinterest and decided to make it into a top instead.
The scarf was quite large, 110cm square, with a hand rolled edge. There was a label but it was blank, I think the fabric is some kind of fine floaty rayon, its definitely not silk.
This clever lady has worked out a way of cutting a square and 2 triangles out of a square shaped scarf which works as the pieces of a top.
Here is an ‘in progress’ photo of my version. Like the original, my scarf had a useful border to add interest.
![20160727_192921-1[1]](https://whatthesew.files.wordpress.com/2016/08/20160727_192921-11.jpg?w=705)
![20160727_193022-1[1]](https://whatthesew.files.wordpress.com/2016/08/20160727_193022-11.jpg?w=705)
Due to the large size of my scarf it was going to turn out as a tunic. I had enough fabric to make both front and back necklines much higher than the original.
The fabric was very slippery and frayed a lot, this was not something I managed to put together in a couple of hours, but most of the time was spent with minor adjustments to the fit, as I am becoming a bit of a perfectionist.
Here is the final version.
![20160803_085319[1]](https://whatthesew.files.wordpress.com/2016/08/20160803_0853191.jpg?w=705)
And me wearing it
![20160801_183625[1]](https://whatthesew.files.wordpress.com/2016/08/20160801_1836251.jpg?w=705)
![20160801_183631-1[1]](https://whatthesew.files.wordpress.com/2016/08/20160801_183631-11.jpg?w=705)
The bias cut produces a garment that naturally hangs nicely, and, like a kimono this top has a loose and floaty nature. It’s also extremely light and folds up into nothing.
Bonus feature
![20160721_172633-1[1]](https://whatthesew.files.wordpress.com/2016/08/20160721_172633-11.jpg?w=705)
I could not believe my eyes when I spotted a box full of patterns left out on the street for anyone to take, near my home. Does someone know where I live?
I had a rummage through and took as many as would fit in my bag.
![20160803_085059[1]](https://whatthesew.files.wordpress.com/2016/08/20160803_0850591.jpg?w=705)
Ok, they are dated, but sewing patterns left practically on your doorstep can’t just be passed by.
Lace insert top
I bought this thin and silky polyester top for £4 from traid.
![20160705_184807-1[1]](https://whatthesew.files.wordpress.com/2016/07/20160705_184807-11.jpg?w=705)
They were having a sale, everything £4, which is cheap for them.
It’s from Marks and Spencer and is a silky polyester fabric with a subtle swirly pattern, reminiscent of something you might see on the top layer of a bridal gown.
![20160705_210422-1[1]](https://whatthesew.files.wordpress.com/2016/07/20160705_210422-11.jpg?w=705)
From the label, I estimate it to be 1980’s vintage, when they were still making things in the UK.
![20160705_210508-1[1]](https://whatthesew.files.wordpress.com/2016/07/20160705_210508-11.jpg?w=705)
I bought it with this refashion in mind, I’d been looking for something white, but when I tried it on at home, the fit wasn’t too bad. One of my first thoughts was that this was such a simple design it would be easy to copy in another fabric sourced from my growing stash.
I wore the top for a month or so, but it was a little too long and a little too tight on the bust so it was time for the refashion to happen.
I had some lace just the right size to insert as a side panel, which would make the top a bit wider.
![20160705_185049-2[1]](https://whatthesew.files.wordpress.com/2016/07/20160705_185049-21.jpg?w=705)
I’d bought the lace in a sandwich box of mixed ribbons, lace and buttons for £1
On closer examination I wondered if it was actually lace, or a piece of broderie Anglaise which someone had already cut around on one side to make lace. I cut around the other side to complete the process and make my ‘lace’.
I opened the side seams of the top, which had been serged. This fabric frayed like hell and its also very slippery, so before attaching the lace I gave each seam edge a small hem.
There was the question of whether to put the lace on top or underneath.
![20160717_083412-1-1[1]](https://whatthesew.files.wordpress.com/2016/07/20160717_083412-1-11.jpg?w=705)
I decided underneath looked neater.
Although the photo only shows pins, I tacked the lace down before sewing, and at places where there were multiple layers, secured the folds with some hand stitching before machine sewing.
I also tried on after the tacking which revealed that at the armhole end, the insert needed to be one flower shorter to improve the fit.
![20160717_085137-1[1]](https://whatthesew.files.wordpress.com/2016/07/20160717_085137-11.jpg?w=705)
![20160717_105907-1[1]](https://whatthesew.files.wordpress.com/2016/07/20160717_105907-11.jpg?w=705)
To complete the refashion I cut about an inch off the bottom edge of the top and re-hemmed to make it a bit shorter.
![20160718_102046-1[1]](https://whatthesew.files.wordpress.com/2016/07/20160718_102046-11.jpg?w=705)
![20160718_184337[1]](https://whatthesew.files.wordpress.com/2016/07/20160718_1843371.jpg?w=705)
![20160718_185202[1]](https://whatthesew.files.wordpress.com/2016/07/20160718_1852021.jpg?w=705)
Bonus feature:
On a recent trip to Norway I found the most fantastic Salvation Army charity shop. As I found this shop with no Kroner left, no room in my case and only 10 minutes before I had to leave, all I could do was take photos.
![20160714_155415[1]](https://whatthesew.files.wordpress.com/2016/07/20160714_1554151.jpg?w=705)
![20160714_155429[1]](https://whatthesew.files.wordpress.com/2016/07/20160714_1554291.jpg?w=705)
This was just part of the homeware section, there were 3 floors, the top floor was all bridal wear.
So many lovely Scandi table cloths and doilies, the photos don’t do it justice.
Skirt made bigger
This is another skirt I bought for £1.
![20160701_153845-1[1]](https://whatthesew.files.wordpress.com/2016/07/20160701_153845-11.jpg?w=705)
I knew it was going to be a bit small but I liked the colours and the shape is my style.
It was by ‘Fat Face’, a brand I usually like, in 100% cotton, fully lined with a thin, plain brown fabric, also 100% cotton, made in India.
![20160701_154007-1[1]](https://whatthesew.files.wordpress.com/2016/07/20160701_154007-111.jpg?w=705)
![20160701_153926-1[1]](https://whatthesew.files.wordpress.com/2016/07/20160701_153926-11.jpg?w=705)
The waistband area had several elements, there were the belt loops (no belt supplied with the skirt), and additional decorative belt loops secured lower down the skirt with buttons.
The basic waistband was a rather nice contrasting piece of Indian style binding with no stretch, which I removed and put in my stash.
![20160705_182244-1[1]](https://whatthesew.files.wordpress.com/2016/07/20160705_182244-11.jpg?w=705)
I couldn’t just shorten the skirt from the waist to make it bigger, the length was OK anyway, I would have to add an insert panel as well as a new stretchy waistband.
I cut open the back seam and inserted a triangle of heavy duty elastic .
I also added a new stretchy waistband, which involved removing and re-attaching the decorative belt loops.
![20160717_074228-1[1]](https://whatthesew.files.wordpress.com/2016/07/20160717_074228-11.jpg?w=365&h=366)
![20160717_074220-1[1]](https://whatthesew.files.wordpress.com/2016/07/20160717_074220-11.jpg?w=365&h=365)
Front and back view of insert, adding 2 inches to the waistband.
Skirt is now a perfect and comfortable fit. I won’t be able to wear it with a tucked in top, but rarely do that anyway.
![20160705_134558[1]](https://whatthesew.files.wordpress.com/2016/07/20160705_1345581.jpg?w=705)
![20160712_085853[1]](https://whatthesew.files.wordpress.com/2016/07/20160712_0858531.jpg?w=705)
Having worn it a few times, I did wonder if the insert would have been better placed at the front because there is a small change to the drape, probably only noticeable by myself – something to consider next time.
Bigger and shorter
I am sorry to say that a number of refashions I have done involve making clothes bigger and shorter.
I have had more success with this process than with making big clothes smaller, particularly trousers, I struggle with the fit on bigger to smaller trousers and am currently engaged in a running battle with a pair of trousers on which I just can’t seem to get the crotch right.
This skirt is one I made bigger and shorter.
![20160705_182312-1[1]](https://whatthesew.files.wordpress.com/2016/07/20160705_182312-11.jpg?w=705)
Fabric is 100% linen, made in Turkey, from per una at Marks and Spencer, with some contrast tapes at the hem end for interest. It cost £1, in a local charity shop which is ridiculously cheap as it didn’t look worn at all. The size was one smaller than I usually wear but I knew this could be fixed.
The skirt had a very simple construction, A-line made of panels, no lining and a very simple waistband, which was only a piece of bias binding really so it was easy to remove.
Removing the waistband already added some stretch, but I am a comfort addict and cut off a 1 inch strip from the top of the skirt, thereby making the waist bigger again because of the A line shape.
The photo shows what I cut off and the finished waistband.
![20160705_181848-1[1]](https://whatthesew.files.wordpress.com/2016/07/20160705_181848-11.jpg?w=705)
A new waistband was made from a thin strip of t shirt fabric in the same colour as the skirt – my stash is getting big, I can find almost anything I need in there now.
I stretched the new waistband slightly as I was sewing it on. If I had been using a unstretchy fabric I would have made my own bias binding.
The only complication was the zip, which also had to be cut shorter, and I had to be super careful not to let the zip pull come off the end of the zip before I secured it with some hand stitches. There was at least an extra inch of zip lurking under the side seam at the bottom end which was easy to recover by undoing a small amount of stitching at the bottom of the zip placket.
![20160705_181928[1]](https://whatthesew.files.wordpress.com/2016/07/20160705_1819281.jpg?w=705)
Finally I added a press stud at the top, there had been a button there originally but my buttonhole foot is broken.
Here’s the skirt being worn
![20160704_153156-1[1]](https://whatthesew.files.wordpress.com/2016/07/20160704_153156-11.jpg?w=705)
Pleased with this one, its so comfy and will go with anything.
![20160704_182427[1]](https://whatthesew.files.wordpress.com/2016/07/20160704_1824271.jpg?w=705)
Waistcoat refashioned from skirt
This skirt belonged to my daughter.
![20160504_135047-1[1]](https://whatthesew.files.wordpress.com/2016/06/20160504_135047-11.jpg?w=705)
She had made up a charity shop bag and I shamelessly went through it first and edited out anything I could use to refashion. I don’t feel much guilt, I do use these shops on a regular basis.
Its from ‘New Look’, 48% acrylic, 31% polyester, 21% wool, made in Lithuania,
I thought this was a rather precise mix of content. Were they aiming for 50:30:20 and got it wrong or was there some actual science went into this to work out the exact optimum combination?
![20160613_161729-1[1]](https://whatthesew.files.wordpress.com/2016/06/20160613_161729-11.jpg?w=705)
This skirt is a perfect example of globalisation, made in Lithuania, Imported via Indonesia, there is a Romanian company mentioned as well, sold by a UK company.
![20160614_174919-1[1]](https://whatthesew.files.wordpress.com/2016/06/20160614_174919-11.jpg?w=705)
There wasn’t a great deal of fabric and I didn’t really have a plan at the start, but liked the colours.
I’ve recently gone through my wardrobe and chucked a few things out but this also identified some gaps, I decided I could do with some sort of body warmer so the future of this skirt was as a waistcoat.
The skirt construction was very simple, there was no lining.
The back seam got ripped and the zip removed, along with all the darts and this was how it looked.
![20160613_162452-2[1]](https://whatthesew.files.wordpress.com/2016/06/20160613_162452-21.jpg?w=705)
I ironed everything flat – nearly had a disaster there, this fabric won’t take a hot iron, but it had the advantage of being virtually fray proof so only a very small seam allowance was needed.
There was just enough fabric to make the front pieces of a waistcoat , so using a pattern I normally use to make t-shirts, but normally adding a seam allowance, I cut the pieces out and lined them with plain white cotton from a men’s shirt in my stash.
![20160613_182517-1[1]](https://whatthesew.files.wordpress.com/2016/06/20160613_182517-11.jpg?w=705)
At this point I started to wish I’d undone the skirt seams and matched up the stripes properly but it was too late now.
I needed a back piece, and an old cardigan in my stash, in a sort of duck egg blue cotton with elastane, seemed to fit and would provide some stretchiness.
![20160613_183357-1[1]](https://whatthesew.files.wordpress.com/2016/06/20160613_183357-11.jpg?w=705)
Here’s how it came together, I just cut the back piece of the cardigan out to start with then did some tidying up.
![20160613_191816-1[1]](https://whatthesew.files.wordpress.com/2016/06/20160613_191816-11.jpg?w=705)
Fully sewn and being worn:
I am going to leave it open for now and if I don’t like it will add some sort of closure later.
![20160614_164845[1]](https://whatthesew.files.wordpress.com/2016/06/20160614_1648451.jpg?w=705)
- ← Previous
- 1
- 2
- 3
- 4
- Next →
